Help And Support
Trade Services - Trade financing
-
How to apply for Invoice Financing (Purchase) on OCBC Velocity
Step 1
- Log in to OCBC Velocity.
- Select “Trade Financing > Invoice Financing".

Step 2
For us to pay your suppliers on your behalf, select "For your purchases".

Step 3
- Indicate the invoice number:
- If you're paying multiple invoices with the same supplier, you just need to enter the invoice number of one of the invoices.
- Loan tenor:
- Indicate how long you'd like to loan for, starting from the invoice date.
- Amount to be financed:
- This amount should not exceed your available Invoice Financing limit.
- If your invoice amount is more than the available Invoice Financing limit, please indicate the remaining invoice amount to be deducted from your account under “Any Other Instructions” (see step 5).

Step 4
If you'd like us to pay your supplier on a later date, select the date under "Process this application on or after".

Step 5
Should your available limit be insufficient to pay the invoice, please enter instructions under "Any Other Instructions":
“Deduct <shortfall amount> from <account number> and send full invoice amount to supplier”.

Step 6
Select a mode of transfer (via Telegraphic Transfer or Cashier's order) on you'd like the money to be sent to your supplier.

Step 7
For Telegraphic Transfers:
Fill in your supplier’s details: Beneficiary name, beneficiary account number, amount, beneficiary bank details and SWIFT code.
You can also include remarks to your supplier.

Step 8
Click "Add Beneficiary" after entering all the required information.

Step 9
You will be able to check which are the beneficiaries you have added here.

Step 10
- Under “On Charges”, tick the “Pay OCBC charges from” box and select your account.
- Tick the “On maturity, please pay the principal amount and any interest from” box as well and select your account.

Step 11
- If the financing currency is different from your invoice, click “For Single Exchange Rate Type Usage” to indicate the rate type.
- Choose “FX Rate” if you are using the bank’s prevailing FX rate or “Other Type Rates” if you have an FX contract with the bank.

Step 12
If you had selected "Other rate types", you'll be required to enter your FX contract details or key in your dealer's name in "Special".

Step 13
Remittance charges:
By default, remittance charges are charged half to you, and half to your supplier. If you prefer other arrangements, please indicate under “Any Other Instructions” as such:
“Remittance charges: fully borne by supplier” or “Remittance charges: fully borne by us”
For pre-shipment financing (if applicable):
Indicate “Pre-shipment financing” under “Any Other Instructions”.

Step 14
- Enter your contact name and number.
- Indicate the number of documents you would like to attach.
- Upload your documents by selecting "Choose File”, followed by “Attach”.
- Save your application details or preview and check the transaction before clicking “Submit”.
- Status of transaction will show “Pending Authorization”. Do notify the authorizers to verify and authorize the transaction before 4.30pm for same day processing. Same day processing is applicable if all documents received are in order and will be subject to checks by OCBC Bank.

Step 15
You'll be notified immediately if you are successful with this application.

-
How to apply for Invoice Financing (Sales) on OCBC Velocity
Step 1
- Log in to OCBC Velocity.
- Select “Trade Financing > Invoice Financing”.

Step 2
To receive cash upfront from your sales invoices, select “For your Sales”.

Step 3
- Indicate the invoice number that you'd like us to pay for.
- If you're paying multiple invoices with the same party, you just need to enter the invoice number of one of the invoices.
- Loan tenor:
- Indicate how long you'd like to loan for, starting from the invoice date.
- Amount to be financed:
- This amount should not exceed your available Invoice Financing limit or the maximum percentage of invoice allowed for financing (eg: 80% of invoice amount).

Step 4
If you'd like us to pay your supplier on a later date, select the date under "Process this application on or after".

Step 5
- Under “On Proceeds”, select the account to credit to.
- Tick the checkbox if you would like to use the proceeds under this application to repay any outstanding loans or bills you have with OCBC.
- Under “On Charges”, tick the “Pay OCBC charges from” box and select your account.
- Tick the “On maturity, please pay the principal amount and any interest from” box as well and select your account.

Step 6
- If the financing currency is different from your account, click “For Single Exchange Rate Type Usage” to indicate the rate type.
- Choose “FX Rate” if you are using the bank’s prevailing FX rate or “Other Type Rates” if you have an FX contract with the bank.

Step 7
- Should you select “Other Rate Types”, a pop-up will appear.
- Enter your FX contract details or select “Special” and enter your dealer's name.

Step 8
- Enter your contact name and number.
- Indicate the number of documents you would like to attach.
- Upload your documents by selecting "Choose File”, followed by “Attach”.
- Save your application details or preview and check the transaction before clicking “Submit”.
- Status of transaction will show “Pending Authorization”. Do notify the authorizers to verify and authorize the transaction before 4.30pm for same day processing. Same day processing is applicable if all documents received are in order and will be subject to checks by OCBC Bank.

Step 9
Upon successful submission, the above message will be displayed.

-
How to set up templates for your frequently transacted seller/buyer, for ease of application
Step 1
For ease of application, you can set up a template with your frequently transacted seller or buyer. Simply click the “Load Template” button to retrieve your saved templates.

Step 2
Select the template you would like to use and click “Load”. You also have the option to use your previously submitted transaction.

Step 3
After clicking “Load Template”, all the information will be pre-populated.

-
How to extend loan tenor or convert pre-shipment financing to post shipment financing on OCBC Velocity
Step 1
- Log in to OCBC Velocity.
- Select “Trade Financing > Trade Financing Amendment and Settlement”.

Step 2
Enter the transaction number or alternatively, click “Search” to show a list of outstanding Invoice Financing transactions.

Step 3
Select “Amendment”.

Step 4
Indicate how many days the loan tenor is to be extended by. For pre-shipment financing (if applicable), this should be computed as approved loan tenor minus pre-shipment financing loan tenor.
Note: The overall tenor of the loan is capped by your approved tenor.

Step 5
Under “On Charges”, tick the “Pay all charges / interest from” box and select your account.

Step 6
For pre-shipment financing (if applicable), indicate “To convert to post-shipment financing” under “Any Other Instructions”.

Step 7
For pre-shipment financing (if applicable), attach a copy of the final invoice, transport documents and any required documents before submitting.

-
How to change the settlement date for Invoice Financing and make repayment for non-SGD Invoice Financing on OCBC Velocity
Step 1
- Log in to OCBC Velocity.
- Select “Trade Financing > Trade Financing Amendment and Settlement”.

Step 2
Enter the transaction reference number or alternatively, click “Search” to show a list of outstanding Invoice Financing transactions.

Step 3
Select “Settlement”.

Step 4
- Under “On Principal”, tick the “Pay the principal amount from” box and select your account. Then, enter the amount to be repaid and click “Add Account”.
- After which, a table will display the selected account and amount to be deducted.
- Under “On Charges”, tick the “Pay all charges / interest from” box and select your account.

Step 5
- If the financing currency is different from the account which you will be paying from, click “For Single Exchange Rate Type Usage” to indicate the rate type.
- Choose “FX Rate” if you are using the bank’s prevailing FX rate or “Other Type Rates” if you have an FX contract with the bank.

Step 6
If you had selected "Other rate types", you'll be required to enter your FX contract details or key in your dealer's name in "Special".

Step 7
Under “Supporting Details”, attach a copy of the FX contract (if applicable) and click “Attach”.

-
How to modify a pending application
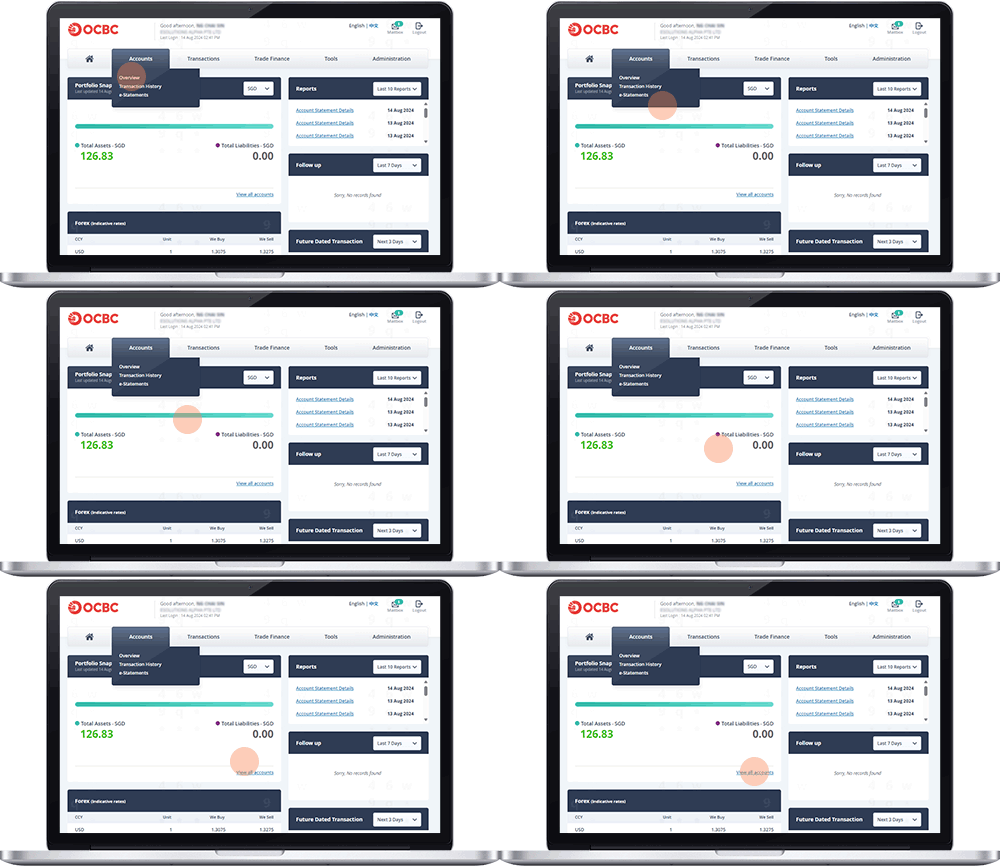
Step 1
Go to Accounts and select “Overview”, or select “View all accounts” under Portfolio Snapshot.
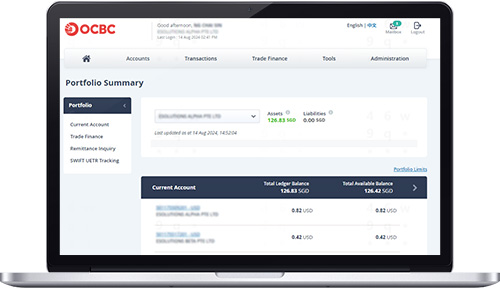
Step 2
Select “Trade Finance” under Portfolio Summary.
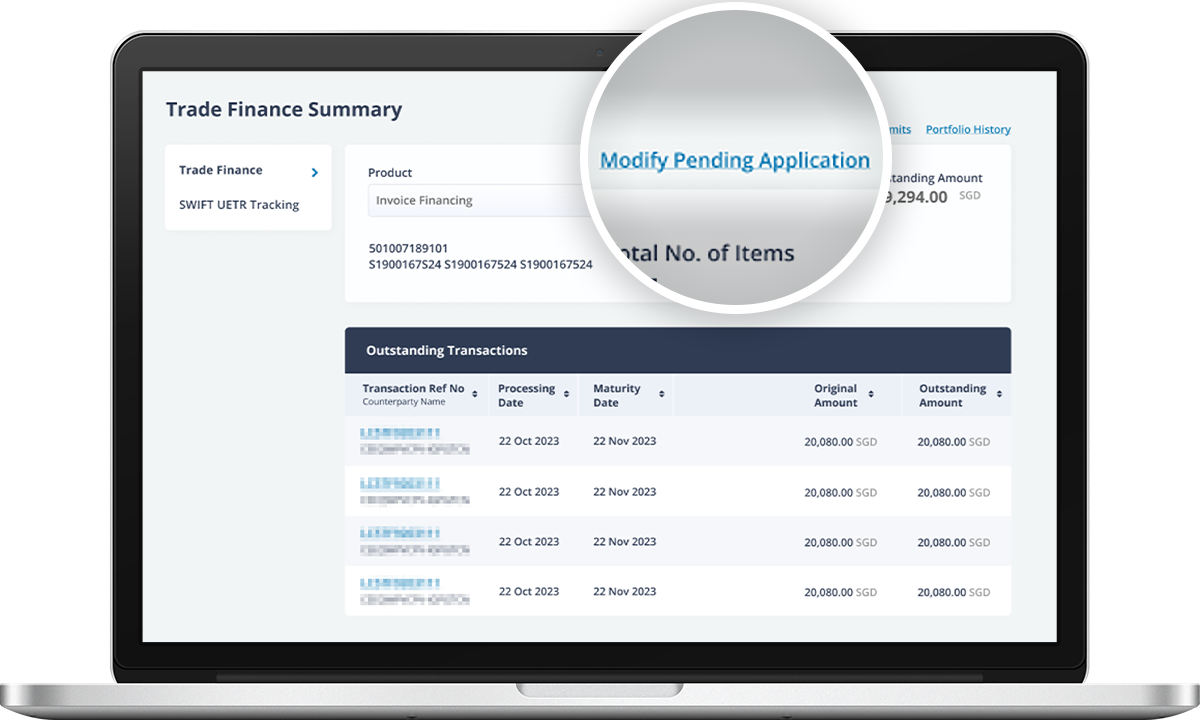
Step 3
Click on “Modify Pending Application” to change the details of your pending invoice financing application that has a “Bank Received” status.
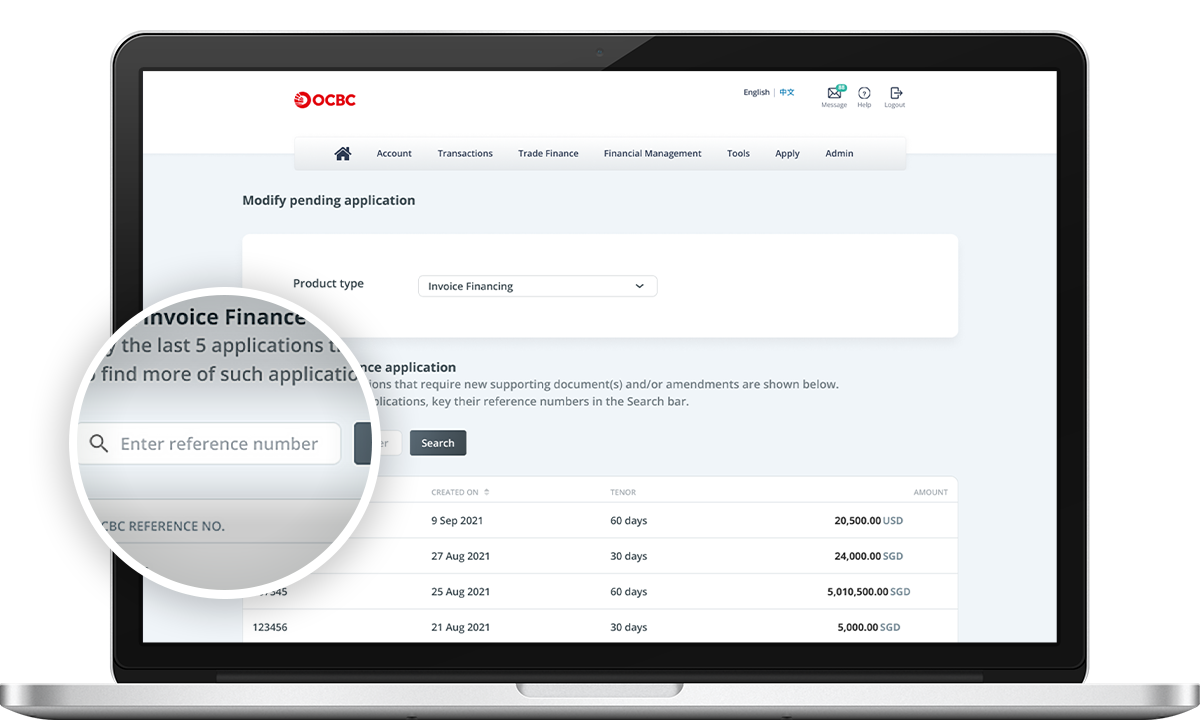
Step 4
Enter your transaction reference number if it does not appear in this list.
Step 5
Select the item you would like to change and follow the steps below based on your preferences.
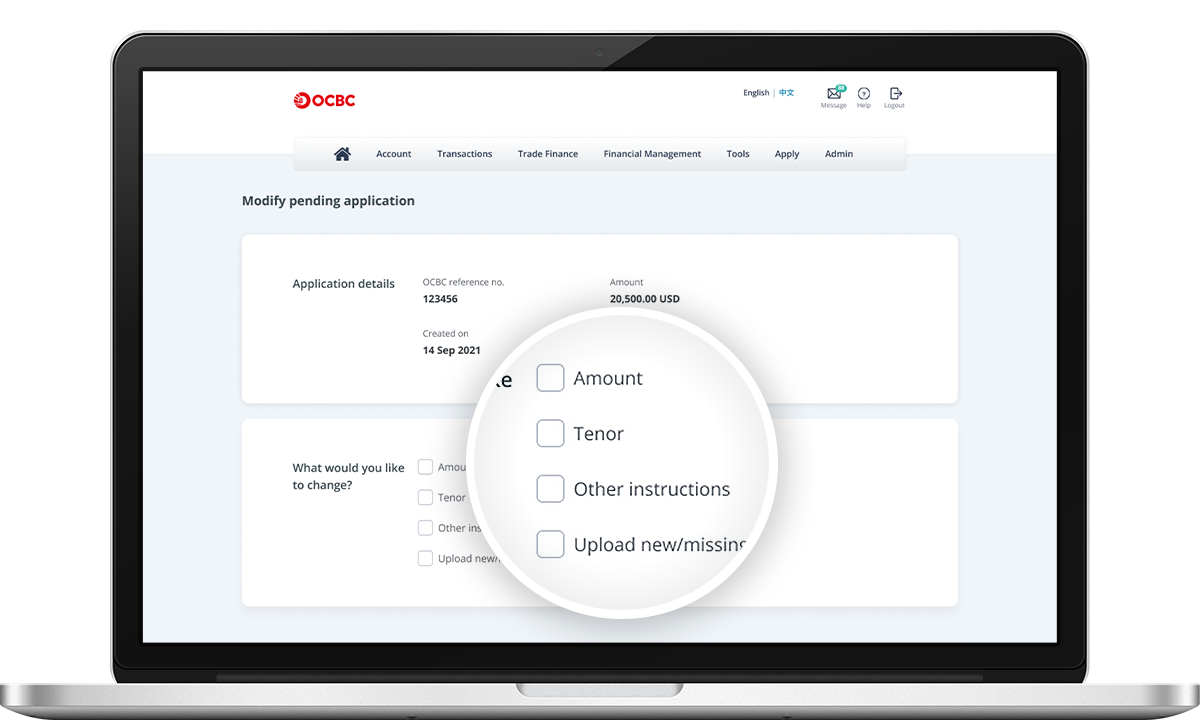
If you wish to make changes to the amount to be financed, follow the steps below:
- Select Amount to change the amount in your application.
- Enter the revised amount.
-
Click Submit after confirming that the changes are correct. Otherwise, click Back to make changes.

If you wish to make changes to the tenor, follow the steps below:
- Select Tenor to change the tenor in your application.
- Enter the revised tenor.
-
Click Submit after confirming that the changes are correct. Otherwise, click Back to make changes.

If you wish to make changes to other instructions made previously, follow the steps below:
- Select Other instructions if your change does not relate to amount, tenor or attaching of supporting documents.
- Enter the revised instructions.
-
Click Submit after confirming that the changes are correct. Otherwise, click Back to make changes.

If you need to upload any supporting documents, follow the steps below:
- Select Upload remaining supporting documents to upload additional or missing supporting documents.
- Upload attachment(s), where necessary.
- Enter the description of newly uploaded attachment(s), where necessary.
-
Click Submit after confirming that the changes are correct. Otherwise, click Back to make changes.

Step 6
You may select more than one item to make multiple changes.
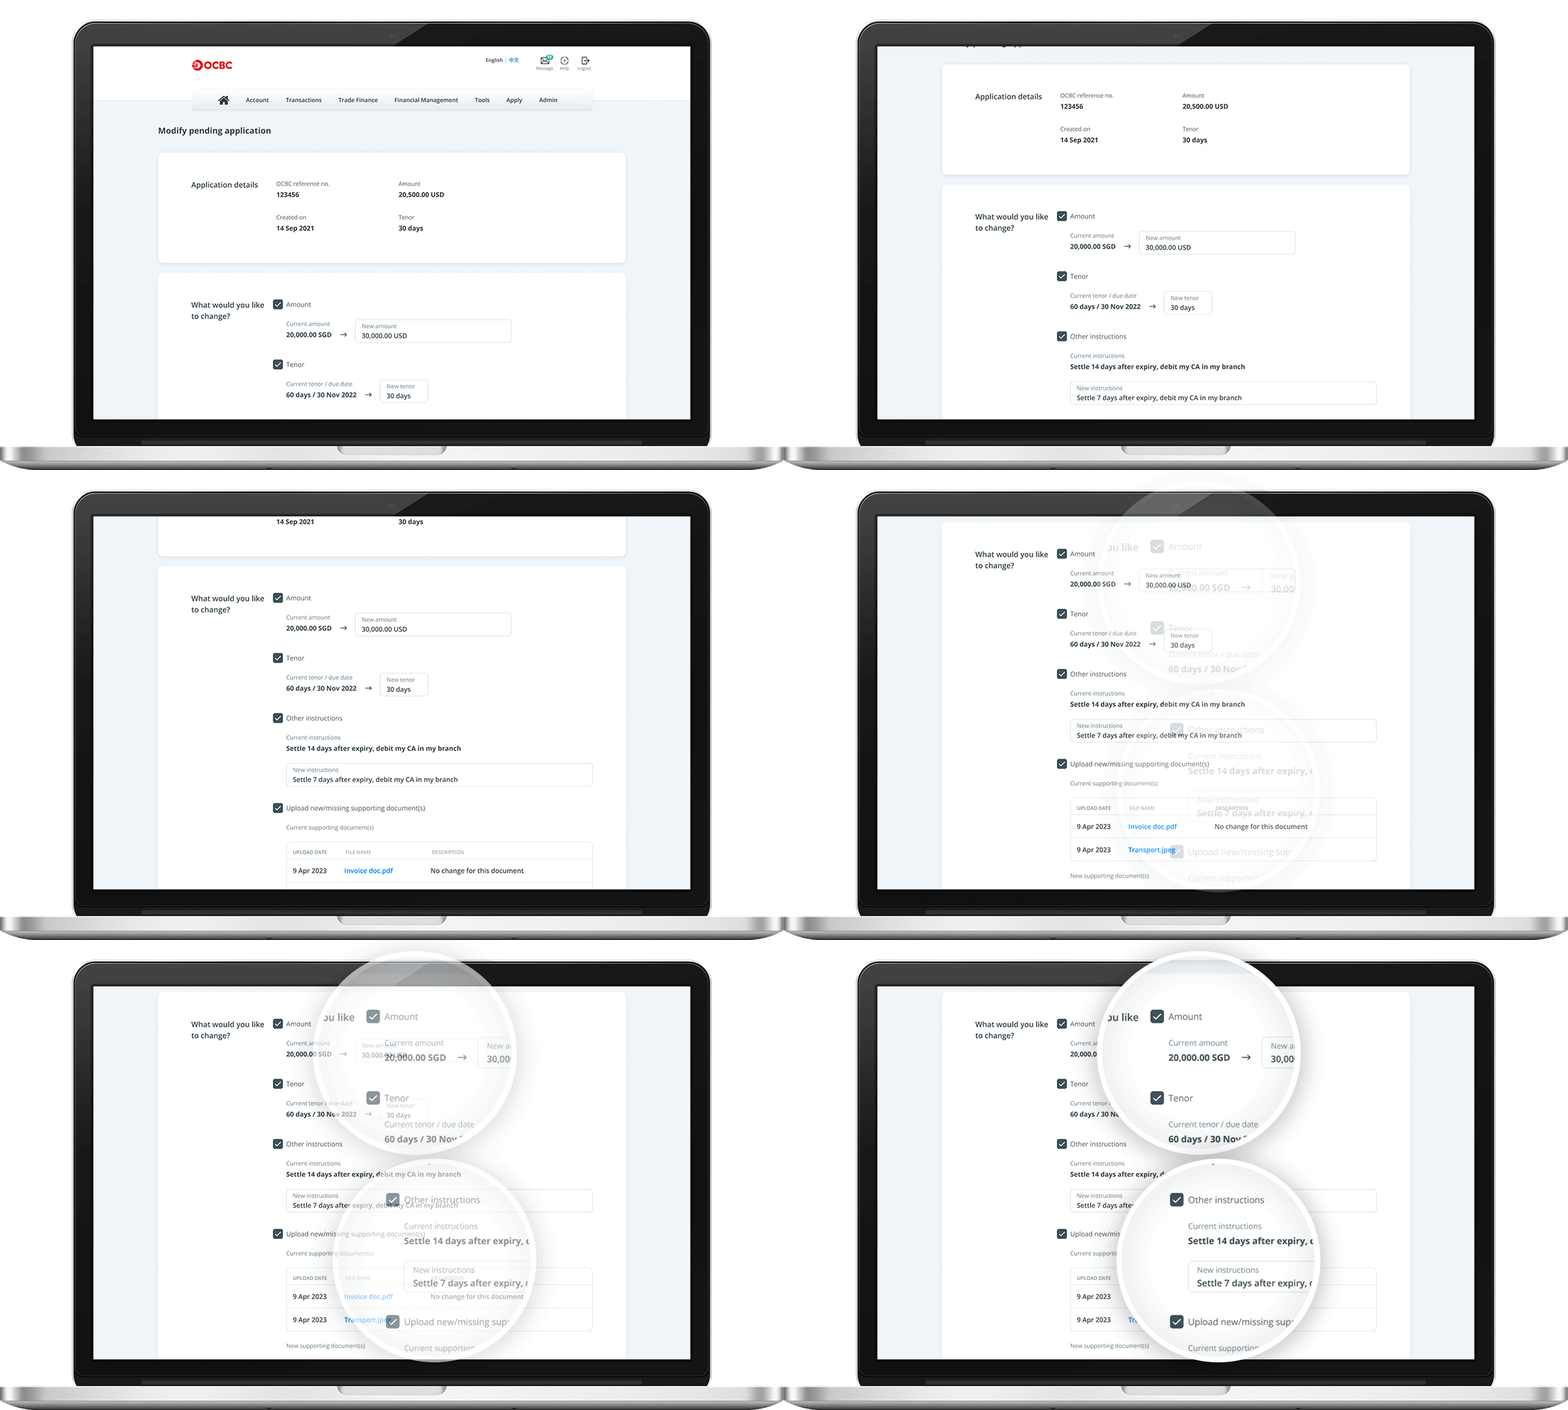
Step 7
Review the changes made.
Click Submit after confirming that the changes are correct. Otherwise, click Back to make changes.
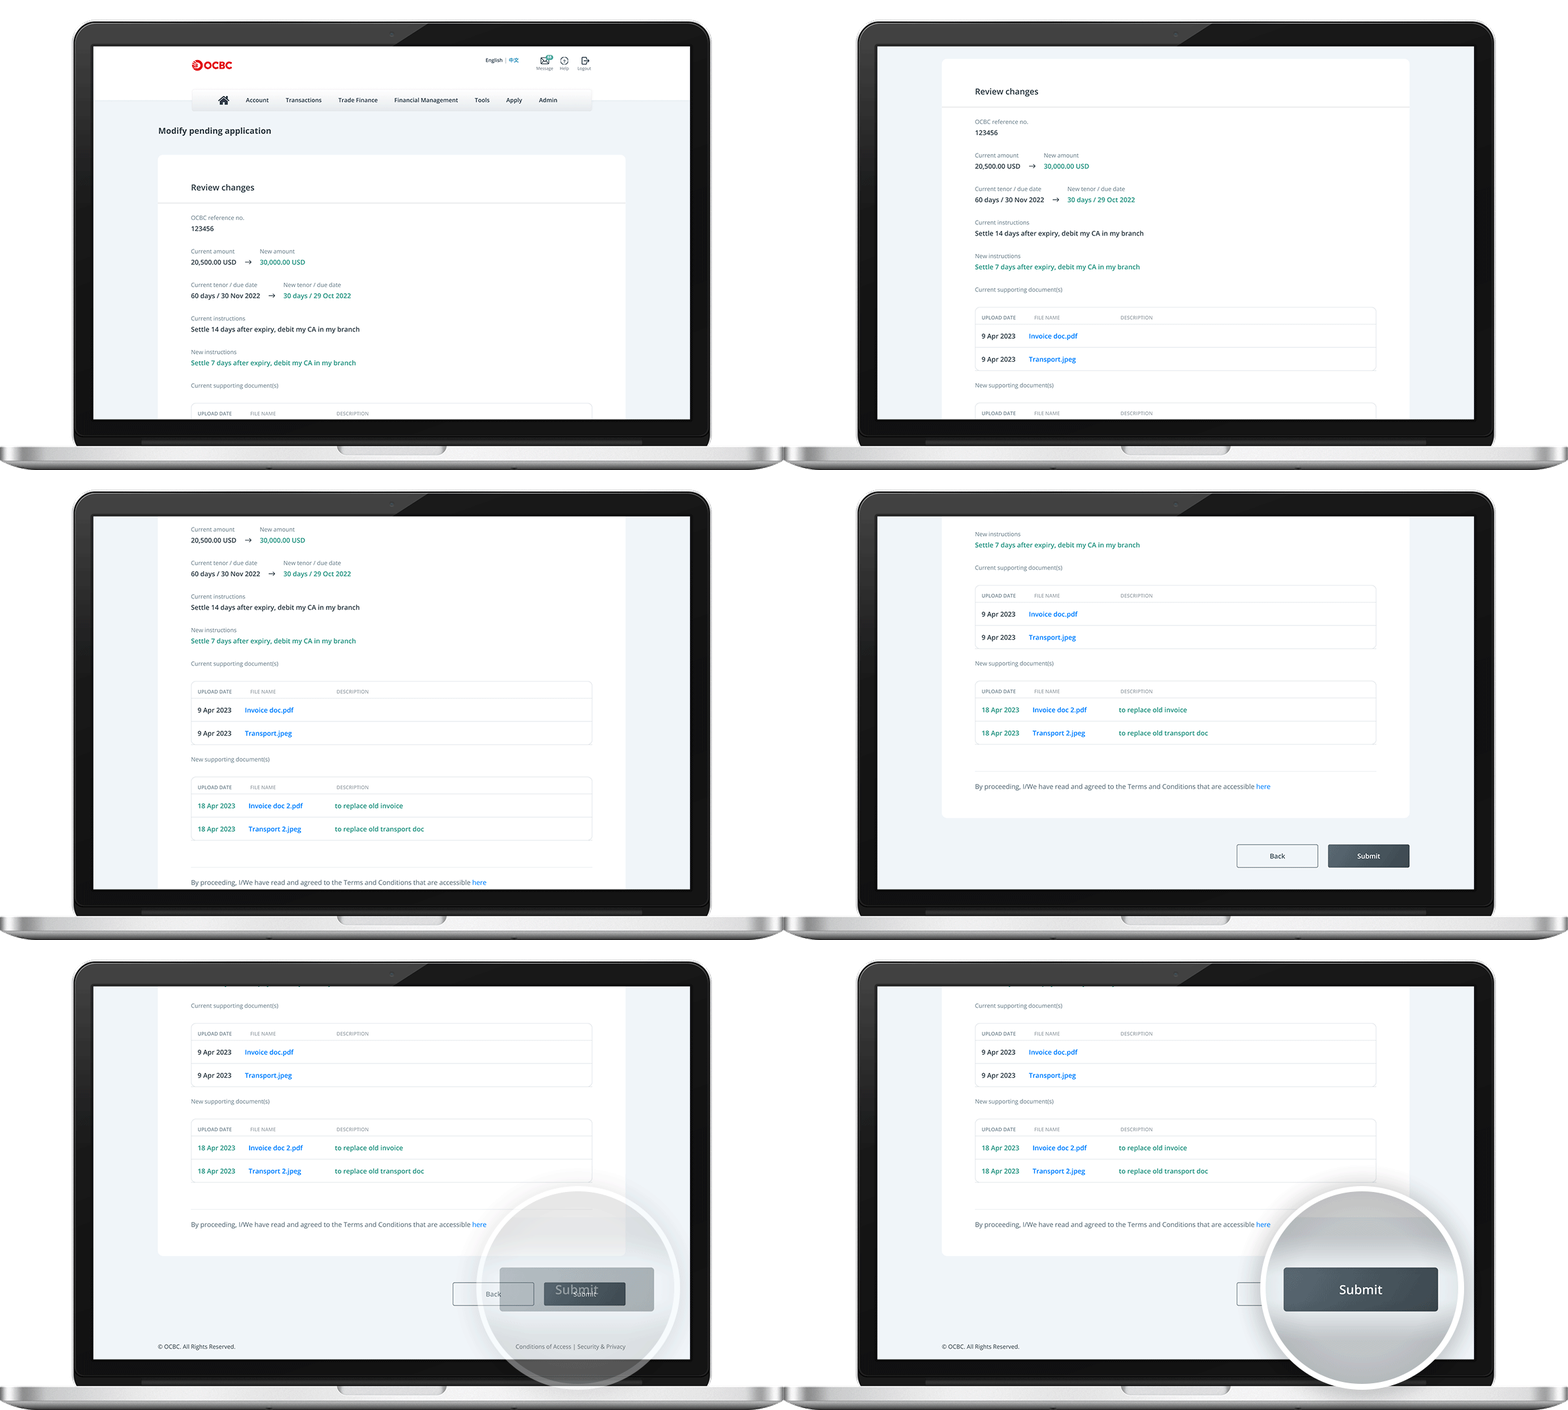
Step 8
Done! You will receive a confirmation of your submission.

